Wednesday, March 31, 2010

For the Girls!


Ok, so I'm sitting on the floor of my bedroom with paint on my hands and paint on my pants. Paint is drying on the walls and paint is drying on my roller. But I took a second to do my daily Post!
So this one is for the girls since I did a post for the boys!

Put spring into your little girl's step with pretty paper-flower clips. Transform tissue or crepe paper into dahlias and use them to decorate barrettes and shoes, or to make a lovely bouquet.

Stack five 4-inch squares of tissue paper; fold into quarters. Draw petal shapes as shown. Cut out, and unfold.

Bend one end of a green pipe cleaner to form a round nub. With other end, pierce a hole through the center of the stack of petals, and then pull it through the hole to form a stem. Scrunch petals up. Wrap floral tape around the flower base and down the stem. Pull the layers of petals apart.

To attach flowers to shoes, wrap stems around shoe clips, tape crepe paper leaves to stems, and hot-glue flower bases to clips.


These yarn flowers are really cute and simple! Here's how


Cute little Bunny Ears! Here's how!


Tuesday, March 30, 2010

An Easy Gift for the Neighbors

I was thinking of a gift I could make my friends that I visit for Relief Society, something Easterish. I saw these serving bowls at (I hate to say it) Walmart, in the Better Homes and Garden Section. I put some brown paper grass to create a "nest" and then topped with yellow peeps and used only the white robin eggs for a natural look. I first put the pink and blues ones on top but it looked weird, so I used just only white, and Ah ha! Success! I think they turned out pretty good. Over all, I probably spent $6 total a bowl! And after the kids have eaten all the candy Mom's left with a nice serving bowl!


Monday, March 29, 2010

The "Nest" Best Thing!!

I love little bird nests! Here are some fun ways to display them all year long or just during the Spring.
I found this cute little nest at a craft store last year and you can't go wrong when you put a clotch over it!
In this apothecary jar I put some moss on the bottom and then another nest with a little birdie on top!
Here is a more Easter like center piece.
A basket that is transformed into nest and holds some pretty flowers!
A make it yourself nest is easy. Just stack 2 wreaths on top of each other, with a smaller one on the bottom and a bigger one on top. This one has some pussy willows added, or you could stick in some flowers. Then just adds some eggs, real or fake!
This nest is on the more difficult side. I wouldn't do it again. I like the ribbons added to the plastic eggs though, dresses them up.

Saturday, March 27, 2010

Question.....

This is a distraction from the projects but I don't know how I feel about this. I've seen it done but would I do it? Would you?
Hang a mirror over a fireplace or place on top of a mantel if it was too high for you to see yourself in? I want to know what you guys think?

Friday, March 26, 2010

Spring into a Week of Projects!

It's about one week until Easter and so for the next week I'm going to post a Spring/Easter Delight! And by delight I mean a craft or decor or gift or recipe! Hopefully you'll get some good ideas!

My first "delight" is a Make It Yourself "Tie for Your Little Guy!" It comes from a the website, Youcanmakethis.com. Type "Tie for your Little Guy" in the search. You have to buy the instructions for this, but it's only $4. I'm sorry but I feel bad it I posted how to do it and robbed a business of their money. It would make me mad if someone did it to me. Well, now that's out of the way, give the website a try! They turn out way cute. I would recommend using an upholstery fabric.


Sunday, March 21, 2010

What's HOT HOT HOT!

This isn't so much a D.I.Y project, but it kind of can be if you are someone who is looking for a change and not sure what they like or want. Hopefully this will inspire you.

I'm sure some of you are very aware of these new yummy things. I love all the new looks and trends. Well, ok I don't love all of them. I could do without the big flowers, but to each his own.

Natural wood in all forms is everywhere. It's green and sustainable, and looks good with all different styles.


Love this Chunky Table from West Elm


The next trend or look that's big is the feminine and botanical look. I'm glad, because I have a secret love of bird cages.


Ruffles galore! We're seeing these everywhere in womens clothing and it now has made it's way into home furnishings and decor!

The big flower! Ok, so this is not my favorite look, but the few example I did pick here I like and can be used in everyday home.

What? Roots and flowers on curtains? Charming!
Homemade Grandma quilts! So comfy and you don't have to pay and arm and leg at Pottery Barn if inherit one from your sweet grandma.


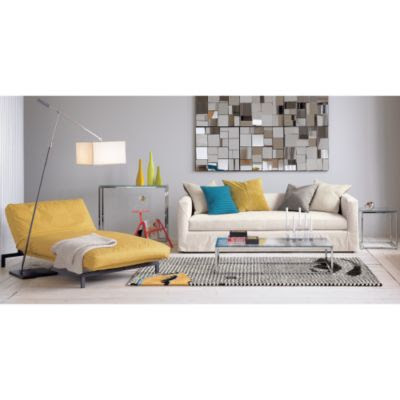
I SAVED THE BEST FOR LAST! YELLOW AND GREY! This has been growing in popularity for the past 2 years, and now you can't open a Magazine without see this glorious combination! "Grey is the New Brown!"
Anthropolgie
WestElm
CB2

CB2


You can find these looks at West Elm, Pottery Barn, CB2, Anthropologie

Wednesday, March 17, 2010

Monday, March 8, 2010

Add some Bling to your Bathroom

I get tired of the same old thing. Don't you? Here are some ways to spruce up your bathrooms using glass tile mosaics. Glass tile has been around for years and will continue to be a big part of tile, so dive in people!
For this project, the level of difficultly lies in what kind of glass you choose. The easiest glass tile to lay are the kind with mesh backing and they're usually the cheapest.
see below for websites

Framing out a mirror is a great project to take on. It's a little area, so it's easy to tile if you're a first timer, and a little goes long way!
Below: Last year we had this small space of dry wall above our mirror and again, I just wanted to add a more modern look my bathroom. Using the product Mastic, which is a premixed glue-like material, I troweled it directly on my dry wall using a 1/8" v-notch trowel. Then put the sheet of glass right on the it. After I did one row, I staggered the next row so it would blend better and not have grid look. Lastly I picked a grout, mixed it according to the package and I was done in 2-3 days! I used the an Italian glass, from Sicis Glass. Check out this site


This is more contemporary look, with the circle glass tiles creating "bubbles" love it!
The nice thing about glass is that it doesn't have to be trendy or contemporary.

Above: Glass tile mixed with slate. It's more of a natural soft look. Great of a spa or rustic feel. Again, notice just a small area behind the sinks, under the mirror.
Check out Waterfall glass from www.walkerzanger.com or the Geologie ( that's how they spell it) Series from Oceanside glass www.glasstile.com

Below: This is subway glass tile. Ceramic Subway tile is your classic tile that's been around since the 1950. Given that name because it is literally tiled in the subway stations of New York City. We have seen subway tile come back in a big way the past few years in all sorts of materials, porcelain, marble, travertine slate, and glass. But it still has that classic, timeless look.
Check out www.crossvilleinc.com They are a very "green" company and also a "Made in America" company!

Monday, March 1, 2010

How I turned This into That

Once again, using my love of paper I created some personal art!


I went to a local craft and scrapbook supply store and picked out some paper in coordinating colors and some vinyl stickers.
I bought these coordinating frames that all match. If you're going to do a grouping of pics or art it's best to have either the frames match or the pictures inside match.
I just kind of played around with the paper until I liked the way they looked together and with the one next to it. Like you would do with a collage.

Lastly, I looked up the word "Home" in the Thesaurus and it gave me a whole bunch of different words for "Home" so I just chose my favorite! You could do words like Love, Kids, Vacation or Family. Family had some great choices, one of my favorite was Posse!) I added my family pictures (that project is for another day) and now I have a personalized and inviting entrance! Enjoy!