Tuesday, July 20, 2010

MY NEW BLOG!

SO after taking the summer off and doing some soul searching I realized 2 things.
1- I love to blog but hate the pressure of having to blog
2- I needed help!

So my friend Lauren and I combined our blogs and now have a joint blog.
it's

houseofchicandpenoche.blogspot.com

Please join and become a follower. I promise that now with 2 of us there shouldn't be a week that goes by without at least 1 post. We will always be shooting for 2-3 but 1 is really all I can promise since we're both busy mom's.
Thank you for following this blog!
Stacey

Wednesday, May 26, 2010

Before and After Bedroom

This Before and After is of our Master Bedroom. It's still a little bit of a work in progress. But I wanted to make this post mostly about the paint colors I used.
BEFORE: This is the ugliest color on earth! A fleshy peach color that ruled the WHOLE house!
So behind the bed I painted that wall a greenish/blue color from Pottery Barn called Wythe Blue.
Then I painted a taupe brown around the bottom of the rest of the room. It's a color called CityScape from the new Martha Stewart line at Home Depot. It's an amazing color! Can I just say that I love colors that can't decide what they are. For example this color is really taupey in my room but a warm grey in the bathroom! I also thought the paint went on really well and it's not very expensive either!

I did this damask stencil in our last house, but I really loved it so I did it again. The top color above CityScape is call Turtle Dove from BEHR and it is also my new love! It's this great blueish, green with even a hint of yellow. It's so vintage-y, it reminds me of the Palace of Versailles.
I could look at it all day.
To do the stencil, apply the top color over the dark, to give it a "bleeding" effect.

More Wythe Blue
So I now enjoying being in this room soooo much more! No more peachy flesh!

Wednesday, May 19, 2010

Revamping an old Frame

Revamping an old frame! My mantle has been a thorn in my side! I've changed a billion times since we've moved in, and I think I'm finally getting to where I like it. Anyway, here is a project I'm finally posting!
A place to display old family photos.


I have this frame I bought at a scratch and dent sale at Pottery Barn years ago. As you can see the middle piece has always been loose. I thought it was time for some revamping.
I sprayed painted the outside this aqua color that I love. It krylon at Home Depot, the best spray paint out there!
Next I mod podge on some paper with a fun damask print.
Lastly I spray painted the inside part white and drilled some holds for hooks at the top.
Instead of laying out my pictures into the grid part of the frame I decided to clip them on useing cafe curtain clips. I used a combination of old family pics and new ones.

Saturday, May 8, 2010

If you do anything PLEASE READ THIS POST!!! Happy Mothers Day!


I've been waiting forever to do this post! But I've been waiting for Mothers Day and now my Library books are over due! What does this have to do with that?! Well.........
I was at the our cute little public library in my little country town (the best eclectic book collection ever!)and I stumbled across a little biography about Frank Lloyd Wright. Being a lover of all things Design and Architecture and wanting to keep my mind "sharp as a tack" I decided to check it out.

Wright is someone I love and abhor (no not adore, ABHOR). His professional life I amaze and covet over and his personal life (to say it nicely) puts a bad taste in my mouth.
Anyway, hopefully you all know about F.L. Wright, and I don't have to do a post about him too because I WILL DANG IT! But to put it in one sentence, Wright "is one of the most innovative and influential figures in modern architecture." His works include the House of Falling Water, the Guggenheim in NYC, and is basically "the Father" of the Arts and Crafts Movement. Any of this ringin' bell?!
So that brings me to the point of THIS post. As I read this little Bio, it mentioned Wright's mother, Anna Wright, and I was so moved and awed at what it said, "Humble livings and lack of financial success did not however, prevent Anna from exhibiting her tasteful sense of interior decoration at the home....things which she liked she surrounded herself and her family. Years later when Wright wrote down his own ideas about interior design, they corresponded in many significant details to the environment that HIS MOTHER had carefully constructed during his childhood." I love that! She used what she had and her creativity and surrounded herself with things she loved. I feel like that is what my life and blog are about. I feel like this speaks so strongly about mothers and what an impact they have on their children. To me, she will always be "The Mother" of the Arts and Crafts Movement!


This is the only pic I could find on the internet of Anna Wright. She is the one holding the baby.

Monday, May 3, 2010

One Man's Trash Mondays

I really really debated giving out this secret........because I don't want my stash to disappear! BUT I figure there's not that many readers and those people who do read my blog ROCK and deserve this little reward so I'm letting you in!

Next time you're at IKEA skip the store and head straight to the AS-IS department. It's a bargin shoppers dream! Sure you have to rummage though bins and boxes but it's worth it.
So my secret and favorite is the little cubbies tucked in the back full of odds and ends of cabinetry! Like below, I found this kitchen cabinet glass door, for $3! Nothing was wrong with it so I took it home to re-purpose it.
I added the vinyl lettering and the little knob at the bottom, which went in like a cinch because there was already a hole there!These holes where already there too because that's where the hinges would go for a door, I used those for hanging instead!
I drilled little notches into the MDF so the screws in the wall would have something to catch and the door wouldn't just slide off of them. Now I have a lovey dovey room! Oh and the lacey curtains I also found in the AS-IS for $9 for the pair! I've also found taller doors, boards, frames sheets ect....Rummage through boxes my friends, rummage though boxes!

Saturday, April 17, 2010

One Man's Trash


Welcome to my new Feature, called "One Man's Trash." Every Monday I'm going to do a post on Thrift Store, Yard Sale, or even "Dumpster Diving" finds! Most Posts will be showing a way to refurbish the item. But sometimes they'll be perfect on their own. LIKE.......

This amazing find I found at the D.I. (a thrift store here in UT). Vintage (I'm guessing, 1970's) Canister!
So amazing! Who would give these away? And I got the whole set for $5! Say what?!
They're all metal with that great avocado green color and I LOVE the style of the words!

When you find "Finds" like this, they can be used in unconventional ways. I will probably be using these in my office to hold my paint brushes, markers and such. I'm a little concerned about the metal being used with to hold edible items. But If want to later put them in my kitchen for decor, I will!


Friday, April 16, 2010

Dish Towel Curtains

This a projectt I don't think I ever posted, but these are also cafe curtains I made for the kitchen in my old house. This is the simplest way!
I found these dish towels and feel in love with them and the fabric was a perfect light linen.


Love the little birdie silhouettes!

Cafe Curtains!

This is a one day project or a two afternoon project. Really easy and fast (if you can sew )BEFORE
My windows in the kitchen needed some dressing up! So I thought I'd make some simple cafe curtains.
AFTER
What do you think? Better? I chose a material that had a little of all the colors I have going on in the kitchen.
So I measured the windows and the material, but added an 2" extra on each side. 1" for the hem and an extra inch for some "slack" so they'd hang nice.
A trick my mom taught me to cut a straight line is fold the material over as you cut and follow that line. A side note, when I was little my mom would make me sew a project every summer. I hated it then, but I'm glad I learned. Thanks mom for teaching me your mad sewing skills!

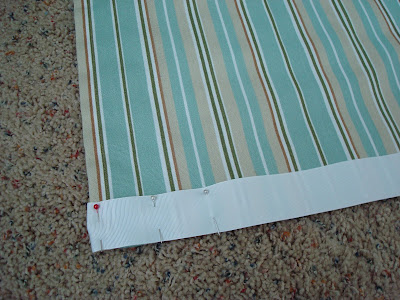
A little pining and little sewing...

I added some ribbon on the bottom as a bit of a finishing touch.
The end! Well, I did have to hang the rods and then clip curtains on, you can find both at any Home Section at you local store.


Friday, April 9, 2010

Picture Blocks

I took a little three day break from blogging to come down off my Easter sugar high and harness that energy into painting my bedroom (pics to come!). My post is not a project I did recently, but I did promise to post it.
These picture blocks are so simple and I love the dimension it gives the photo.


So at you local home improvement store find a 2x5 unfinished piece of wood and have an employee cut it into 5" pieces, about 9.cents a cut. I think the first 2 are free. I don't have a pic of the raw wood because I did this when we moved and my camera was somewhere between lost and packed.

Next paint it black or brown, depending on your style. and sand the edges.

This is a handy little laminating/sticker machine from any craft store. It's about $32 dollars and if you use a 50% off coupon at Roberts Craft, cha ching!
Basically you feed your 5x5 photo through the machine and it puts adhesive on the back turning it into a sticker!
Lastly, if you want to hang it on your wall, nail a little bracket onto the back.
So cute!

The photos were taken by Sweet Apple Photography, but I think now she is The Enchanted Photo. We went the Sanpete County Fair and by some shear form of luck, had the place all to ourselves!

Monday, April 5, 2010

Easter Candy Left Overs!

Hope you had a great Easter! Did you eat all that Easter candy or are there still piles laying around you home?
This idea for making Smore's with your Easter candy, comes from the blog rootsandwingsco. It would make a fun after school treat or a dessert for dinner!
Mmmmm! Looks good!


Friday, April 2, 2010

Plant a Delicious Surprise for Easter Dinner Dessert!

I've been waiting forever for the right opportunity to do this post. I love, love, love this!


A Dessert it a Pot!
  • Ingredients

  • 1/3 cup vegetable oil, plus more for pots
  • 3/4 cup unsweetened cocoa powder, plus more for dusting
  • 1 1/2 cups all-purpose flour
  • 1 1/2 cups sugar
  • 1 1/2 teaspoons baking soda
  • 3/4 teaspoon baking powder
  • 3/4 teaspoon salt
  • 1 large egg plus 1 large egg yolk
  • 3/4 cup buttermilk
  • 3/4 teaspoon pure vanilla extract
  • Quick Chocolate Frosting
Click above for a frosting recipe or one of your favorite.

Directions

  1. Preheat oven to 350 degrees. Brush the inside of each flowerpot with oil, and line with parchment paper or foil. Brush lining with oil, and lightly dust with cocoa.

  1. Sift cocoa, flour, sugar, baking soda and powder, and salt into the bowl of an electric mixer fitted with the paddle attachment. Add egg and yolk, 3/4 cup warm water, buttermilk, oil, and vanilla; mix on low speed until smooth, about 3 minutes.
  2. Divide batter among prepared pots, filling each about two-thirds full. Transfer to a rimmed baking sheet. Bake, rotating sheet about halfway through, until a cake tester inserted into centers comes out clean, 20 to 30 minutes. Let cakes cool completely on sheet on a wire rack.
Frost cakes with an offset spatula; sprinkle with crushed cookies. Top with candies; "plant" 1 mint sprig in each cake.

Thursday, April 1, 2010

Easter Morning for the kids!


I love this idea! Ii comes from my friend Jane's blog, check it out HERE !

At Easter she gives her kids Magic Jelly Beans, they plant them in the front yard and every year they grow something fun.

In the morning they get to go outside to fun surprise.
This year she found these at Walgreens for $1!! (she can fill you in on the details)
This is another little fun project for the kids. They could help you make and you could leave them out for the Easter Bunny, kind of like Cookies for Santa. Or you could make them and have the Easter Bunny leave them for the kids.
TO MAKE: Buy piping bags from the bakery at a grocery store and the fill with Orange goodies and tie with a green ribbon.